Scrappy Double Wedding Ring Quilt Instructions... my way!
Several friends have asked how to make a Double Wedding Ring quilt or table topper. It is really easy if you understand the construction. So I said I would make up a blog to show them how I do it.
There are NO Quilt Police!
I need to say this first and foremost. There are NO quilt police. There is no exact rules to quilting and sewing. There are guidelines that we can recommend, but when it comes down to it, it is all choices..and you get to make them. Some you will find out will work grand, some you will find out come out lousy or don't work at all. BUT that is what crafting is all about being the artist.
Now saying all that, I will put this out there before you ask:
A. "The 1/4" seam allowance. Do you have to use a 1/4" or a Scant 1/4" seam allowance". NO you do not HAVE TO... but that is the quilting standard of our time. What will happen if I use 5/8" seam allowance like I am use to? What will happen is you will use more fabric because you will need it for those wider seams. Quilting patterns and templates are made with the 1/4" seam allowance so you will have to adjust your patterns and templates to accommodate that extra bit. BUT if you use a consistent seam allowance measurement through every seam, it will all come out ok. It is your choice. I used 1/4" seam allowance as the templates called for for my quilting example.
B. You will be asked to choose Cotton as your fabric. Do you have to? NO you can use what ever makes you happy. Please note some fabrics are more stretchy than others so it will affect your pieces laying nice.
D. Do you have to use a Rotary cutter and matt. NO you can cut with scissors or your teeth, I don't care, but you need the fabric cut consistently, even if you use your hubbys chainsaw.
E. Do you have to use spray starch or Best Press. NO you can use steam or dry iron but your fabric will play better if you use Spray starch or Best Press. and the bias cuts won't get as stretchy or get wonky if you use one of them.
F. Do I have to buy the Templates. NO you can draw your own, but.... [ha ha] it comes out better if you use a pattern of some sort. You can search in Google and find Paper Templates that you print, cut out and use, but after a cut or two you will really want to invest in the 1/8" plastic templates. If you're not sure if you're going to like doing the DWR you might do one Ring with the paper templates, by then you should know if your going to do more, then you can make a better decision
.
These instructions are for the first time Double Wedding Ring [DWR] Quilt maker. This is going to be a long blog, but it will give complete instructions with pictures.
Supplies Needed:
Templates
Fabrics
Rotary Cutter
Cutting Matt
Sewing Machine
Iron
Ironing board
Spray starch or Best Press spray
Pins
Thread
Fabric Discussion
Kind of Fabric?:
Pretty much any kind of fabric will work. Traditionally the DWR pattern is done in Cottons. Some cotton's are thinner than others. I try to use fabric's that are similar in weight [thickness] because they lay together better. I will warn you the fabric that you use for your background needs to be at least a medium weight to heavy weight cotton fabric. Why? The thin cotton will show your seam allowance easier and also not wear as well as the heavier cotton. That is my two cents you can do as you please it is all choices.
Solids or Print Fabric?
It is according to you of course. Traditionally if you are doing the "Planned" Arc, you will choose fabric that is a gradation from light to dark, from one side to the other of the arc. Here is an example:

In the Scrap Arc traditionally you use compatible fabrics of different patterns in the arc. Each wedge is a different pattern or color. Here is an example:

In the Seamless Arc it is best to use a large print so it is busy enough to give texture to your arc's, or it may not have enough contrast to make your arc's stand out from your background. In the photo below you will notice "Shar" used a strong floral print. Here is an example:

Cornerstone Fabric: Traditionally your corner stones are a defining piece to your DWR arc's. Usually contrasting to what you choose in your arc's. Some make all the cornerstones the same, some make the four joined cornerstones contrasting.. for example a cream and a burgundy, or a green and a red, or a white and black. all choices. See the following image for an example of contrasting cornerstones:

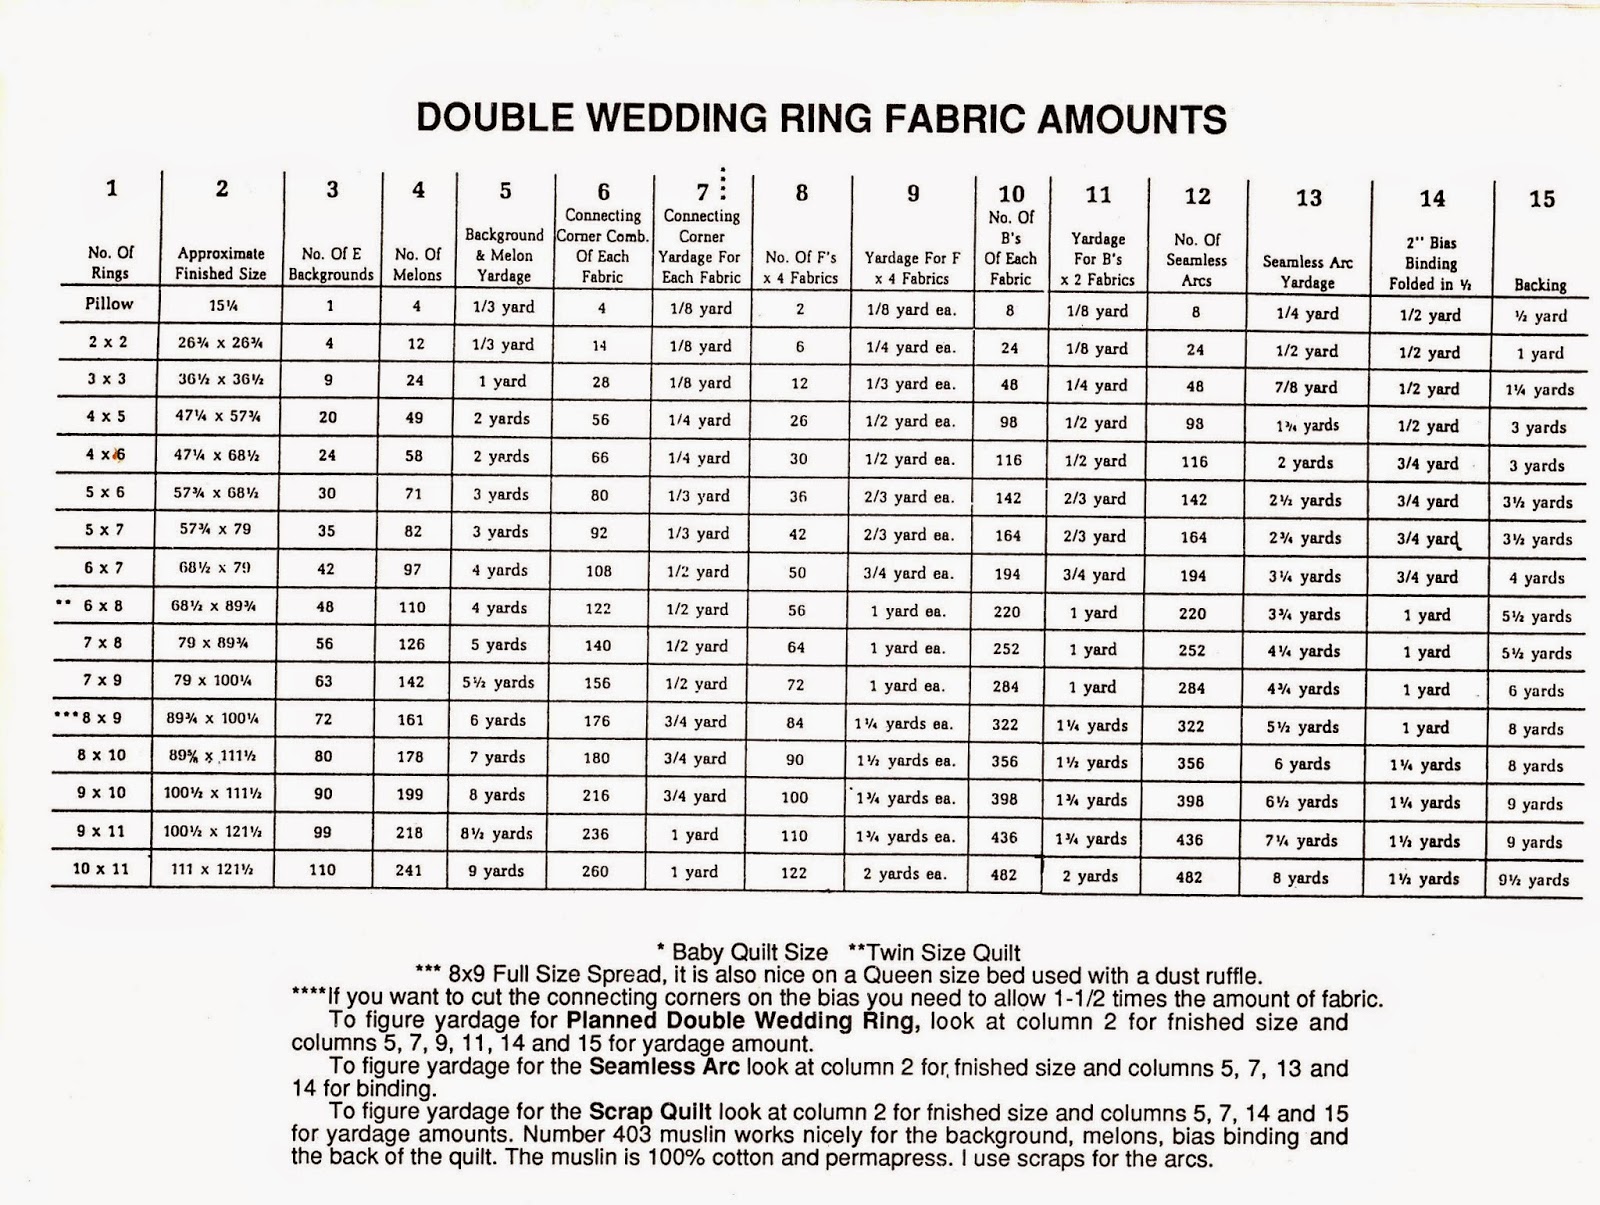
Fabric Guide
This is the guide that came with my templates. These are not my numbers or calculations
Thread
I believe if you are using cotton fabric, you use cotton thread. You do as you please. I have heard that if you use polyester or rayon thread, the thread can eventually saw through your cotton fabric. Is that true? Who knows? I haven't seen any studies on it. It seems to make sense, but it is all choices.. I choose to use Cotton thread with Cotton fabrics
Template
Next you will need to have your template for the double wedding ring blocks. Below is a picture of my templates I have had for 30 years. I love them, they are by Sharlene "Shar" Jorgenson. Here's the best website for them: http://www.qheartland.com/pd-double-wedding.cfmYou will notice I have marked them with identifying letters. I will explain these:
A. Is used to cut the center four squares in the fabric arc. it is called a wedge [Arc: a line or shape that is curved like part of a circle]
B. Is used for the two pieces on each end of the center 4 pieces.
C. Is the Melon [which I call the football], it is the center piece cut of background fabric that is surrounded by the two arc's in the piece.
D. Cornerstone piece, It is the joining piece at the end of the two arc's.
E. Background piece, this is the background that goes in the center of the ring.
The next three templates, which are on the left of the picture confused me at first. The Planned Arc and the Scrap Arc Pieces are not used to cut out fabric that will be used in the DWR. They are used to trim your pieced arc's. I never use them, but they are there to use to see if your pieces after sewn are correct.
The Seamless Arc is used to cut fabric to be used in the DWR. It will take the pace of the pieced arc's like are used in the Planned and Scrap Arc's.
Planned Arc piece: discussed earlier
Seamless Arc piece:discussed earlier
Scrap Arc piece: discussed earlier

Paper templates: If you need them here is a link:
Ok lets get to it!!
Fabric
This is a Scrappy Double Wedding Ring Quilt. I first lay out my fabrics that I want to use. As you see by the picture I am using a slew of fabric's. I laid mine out where no two same pattern/colored fabric were together, so it stays scrappy and random. It's a choice.
I cut up to 6 layers of fabric at a time with my rotary cutter. I stacked the fabrics as shown below so I would not have to restack to mix up the patterns/colors. I should have mixed the greens/yellow into the pinks but didn't, and had to mix them in after cutting.

Cutting Pieces
Using the "A" wedge
You will need thirty two [32] "A" wedges to make ONE complete DWR ring.
In the picture below you will see my "A" wedge pieces stacked to the right in pink.
Using the "B" wedge
NOTE: it will take one [1] piece with the "B" template piece facing right and one [1] with "B" template piece facing left for each arc. You will need eight [8] Right "B" Wedges and eight [8] Left "B" Wedges or sixteen [16] total "B" wedges to make one complete DWR Ring.
In the picture below you will see my "B" wedge pieces stacked on left in Green and Peach.

Using the "D" wedge
You will need to cut eight [8] total "D" wedges to make a complete DWR Ring.
Picture of the "D" wedge below.

Cut one [1] background piece "E" for one DWR Ring.
Picture of one background "E" piece in the center and 4 "Footballs" around it.

Cut four [4] Melon's [I call them footballs] for one DWR Ring.
Picture of the football/melon centers below.

Sewing
Starting with the "A" wedge pieces, sew two [2] together on long side.
I chain mine as you see in the picture. Chaining means to sew the first two [2] together and when you get to the bottom edge stop. raise pressure foot and put the next set in, putting pressure foot down, continue to sew without cutting the thread, until all paired pieces are sewn. .

Once you have sewed all "A" wedges into pairs, lift pressure foot and cut thread. I then use the machine cutter that is at the end of the head of the sewing machine to cut the pairs apart. It is faster than using scissors.
Take these pairs and one at a time iron the seams to one side.

Once you have pressed the pairs of "A" wedges, I divide them into two stacks.
[ In the picture I have the pairs of "A" wedges divided into two stacks for easier grabbing and sewing together. It is a choice thing, you don't have to. You can grab from one stack.]

Sew two pairs of "A" wedges together to make the four [4] "A" pieces for the center of our arc. Again I chain sew mine together. It is a choice.

Press your seams to the side on all the now sewed together "A" wedges.
Place your Left "B" wedges to the left side, then your Center "A" Wedges in the center, then the Right "B" Wedges on the right side.

Sew the "B" Wedges to the Center four "A" wedges

Press Seams to one side.

Bring "footballs" or Melons near your sewn and pressed Arc's.

Fold your "Footballs" in half as shown in picture. and iron a crease. This crease will be used to find the center of the Football.

You will now pin the football to the completed arc.
Step 1: Pin the crease of the football to the center seam of the arc. The four [4] "A" wedges help you find the center. The center of the arc is the center seam that sewed the two "A" wedge sections together.
Then pin the ends of the football to the ends of the Arc.

Pinning discussion here: This football will be sewed to arc's on both sides, so the pointed ends are very important when you're pinning and sewing. That point is going to be shared with each arc. So notice in the below picture I place my pin 1/4" from the end of the football and also 1/4" from the end of the Arc, and it should be 1/4" from edge of football. Or basically the center of that pointed end. Even though the football is pointy, from the point you measure 1/4" in and put your pin, matching that on the arc piece.

Step 3. Now place pins between the three in the football/arc. You will use the seam line of the "A" wedges that are sewn together. When done is should look like picture below.

Sew the football to the arc, going slow as it is a curve, and using a 1/4" seam. this is very important on those points, so there is room for attaching the other arc later.

Once it is sewn is should look like this.

Once sewn, press the seam to the side. Press the seam towards the ARC!! So the seam allowance won't show in the football later. DO not press the crease out of the open side of the football we will be using that crease when you attach the next arc.

Before we attach the next arc, we need to attach the "D" wedge. This is also the cornerstone of the arc. In my scrappy quilt I decided not to have contrasting colors/prints for the cornerstone. It is a choice. Notice in the picture below, we have the just completed Arc and Football, we have the next arc with a corner stone at each end. I laid them as they will be when sewn together. Notice the crease is still in the football, we will be using that again.

Next we are going to sew the Cornerstones "D" onto the unattached arc. Discussion here: notice in the picture that the curved tail of the cornerstone "D" is going to the right and the curved edge of the "B" wedge on the arc it curved to the left. You may think "How are we going to sew that?" it is actually easy if you understand how to do it. You are going to sew SLOWLY.
Step 1: Line up the top corners of the arc and the cornerstone "D". Top and beginning of side should be lined up.

Step 2: VERY SLOWLY take 3 or 4 stitches and stop.

Step 3: Raise pressure foot and reposition your arc fabric so that it is lined up with the side of the cornerstone "D" piece.

Step 4: Lower pressure foot, and take a few more stitches. Then stop, raise pressure foot and move the arc fabric so it is lined up with the edge of the cornerstone "D" piece again lower pressure foot and finish sewing. TaDah!! easy peasy.

This is how it should look once sewn.


Sew a little adjust

sew a little, adjust

Sew to finish, done!

Press the seams to the side

Now the arc and cornerstones are attached will will be attaching it to the football arc combo.

We are now going to pin the football combo to the arc with the cornerstones, and we are going to use that crease in the football to line up and put the first pin in the arc. We are again going to use the center seam of the four [4] "A" pieces of the arc to use as center in the arc.

Next pins to put in will be at the end of the football. Remember how I told you before that the pointed end of the football would be used by both arc's. Well this is when we use the remaining half of that point.
Step 1: On the football/arc combo you're going to use the seam allowance right at the end where the pointed end of the football is and you're going to pin that seam allowance to the seam allowance that is between the Cornerstone and the end piece ["B" wedge] on the just completed arc. Bring the seam allowances together and place a pin. Do this on each end.


Step 2: Now line up the crease in the football to the center seam between the "A"s of the new arc, and pin.
Step 3: Between the center pin and the end pins place a pin at the "A" Seam on each side of the center Pin.

Step 4: Now line up the ends and place a pin.

See picture below to see if your placement of pins is correct.

Sewing discussion: Notice that the cornerstone end is straight then when you get to the seam allowance where the football/arc combo come in, the stitch line starts curving following the arc. Just go with that. Because it is best to do it all in one seam from one end tip to the other end tip. Just go slow till you pass the seam allowance and transition onto the arc. Remember this because it will transition again at the other end the same way.
Sew these pieces together.

Remove pins and it should look like this:

Press seam allowances towards arc's.

Flip over and press the seam allowances towards arc's again. This is important because when finished you don't want these seams to show through the football.

Should look like this when pressed well.

Follow these instructions from the beginning until you have four [4] of these arc footballs done.
Now we are going to attach the football arc's to the center background "E" piece. You will see in the picture below the center background "E" with the four [4] Arc's around it.

First thing is we need to find the center of the "E" piece.
Fold the "E" piece in half and press a crease

As with the football arc's we will use the center crease to mark the center of the "E" piece and it will be pinned to the center seam of the "A" section of the football.

The next pin will be placed at the end of the arc, at the seam where the cornerstone is sewn to the arc. The Ends of the side of the "E" piece, is very narrow, it is like the point of the football. You will be sharing that end with the next "Football" on the side of the "Ring". So be sure you only use a 1/4" seam allowance so it can be shared. Pin this the same at both ends.

Then as was done with connecting the football to the arc, pin the two "A" seams between the center and the end where the cornerstone connects. Do this on both sides of the arc. As shown in picture.

Flipping it over it will look like this.

Sew them together going slow as you go around the curve.

Remembering at both ends you will be sharing those skinny ends, as you did the points on the football/arc.

Iron with the seam allowance going towards the arc, so it doesn't show in the background "E" section.

Repeat adding the "Footballs" to the opposite side of background "E" piece.

This is how it should look

Remember to press the seam allowance away from the background "E" Piece

Once you have the "Football's" attached to the background "E" piece you will need to pin and sew the "Cornerstones" together as shown in this photo. Then press.

And this completes one Double Wedding Ring circle/Ring.

Hope this helps!! It is fairly easy. Just remember to use the 1/4' seam allowance.